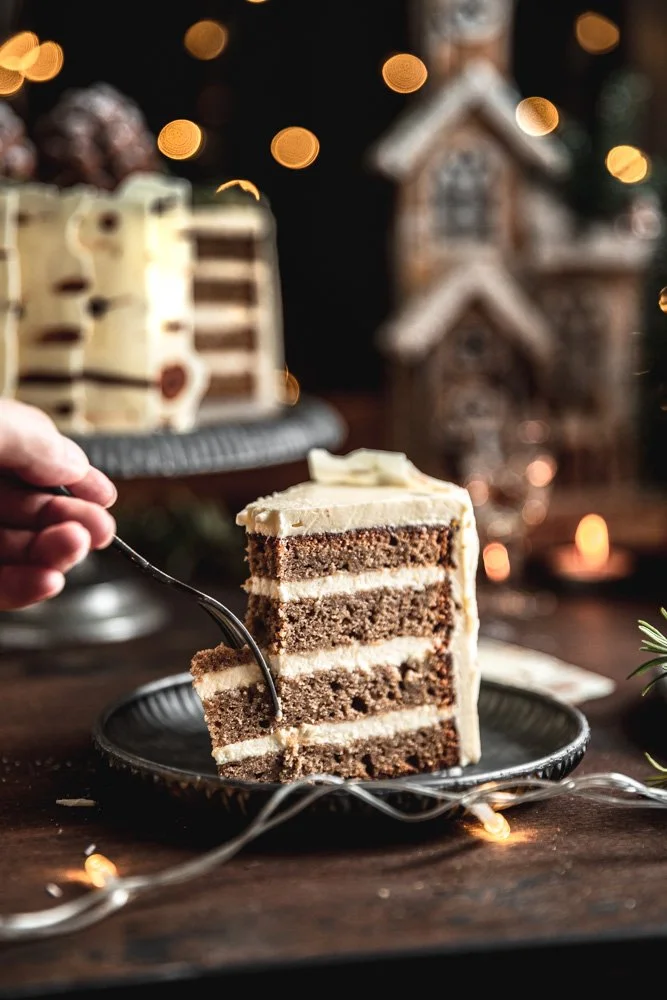
Gingerbread spiced caramel cake with eggnog buttercream (and edible pinecones!)


A moist and rich spiced cake with a caramelised twist to it, covered with an eggnog Swiss meringue buttercream and white chocolate bark and topped off with edible pinecones.
The pinecones are made with the cake trimmings, so no wastage! They look super cute, if I do say so myself, plus they taste good - love a good edible decoration (that’s not made of fondant!).
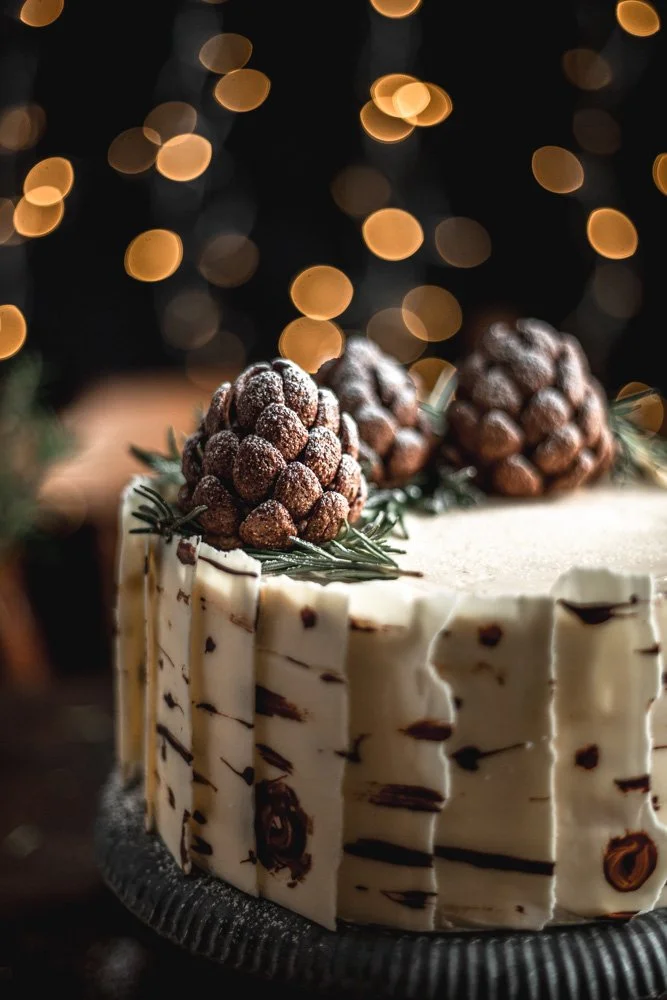
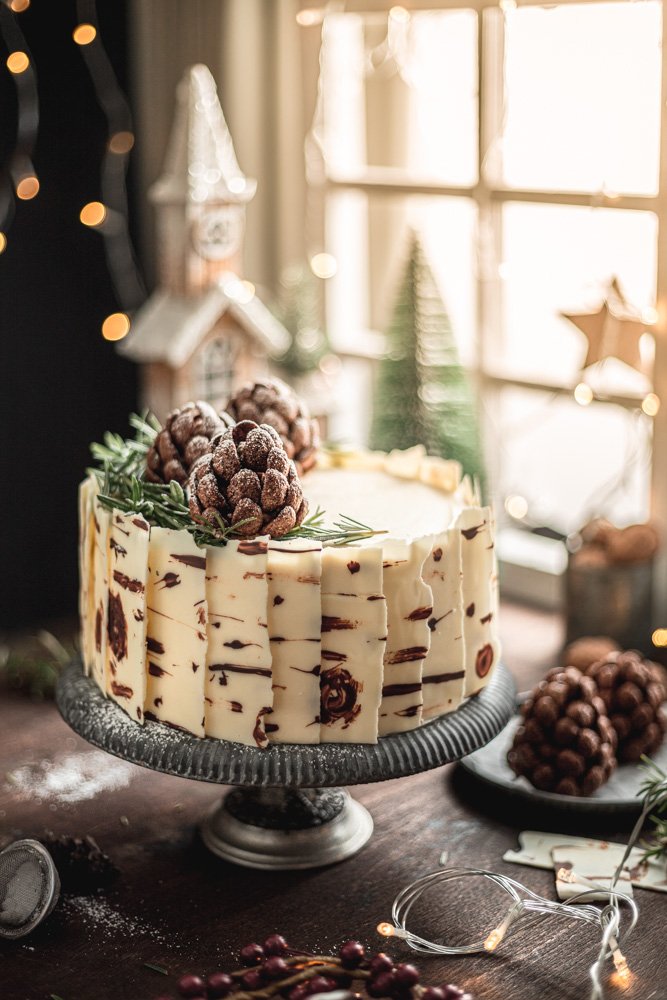
This cake’s decorations are simple, yet undeniably festive.
I didn’t want to NOT have decorations, but I also didn’t want to have to spend so much energy on just decorations (looking at you, original gingerbread house cake…). I also didn’t want to go toooo simple (like I did with my previous Christmas cake. This was a happy medium, plus I got to use up the cake scraps (though, you can’t NOT snack on some of it… that would just be wrong…).

This is meant to be a caramel cake with gingerbread spices, however I realise that it’s basically just a gingerbread cake since regular gingerbread uses golden syrup too. It’s not tooooo spiced though, so the caramel flavour does come through. The sour cream gives it that moistness. I love adding sour cream into cakes.
The eggnog buttercream uses Swiss meringue buttercream, which I love because it’s totally smooth, not too sweet, not as finicky as Italian meringue buttercream, and whiter than American buttercream. The only thing I don’t like is that it uses a bunch of egg whites. I would not suggest French buttercream as, although delicious, IMO you need a firmer buttercream for a layer cake. If you don’t want to have to use a bunch of whites, feel free to stick to American buttercream or your buttercream of choice.

If you prefer to have thicker layers of cake, feel free to bake it in 3 cake pans instead of 2. You may have to bake them for a shorter amount of time, and you won’t have to slice the layers in half.
I’d suggest making each element in the order I’ve put them in the recipe. If you can, bake the cake a day in advance to let it have time to fully cool. Make the buttercream then, on the same day so that you don’t need to re-whip the buttercream, the pinecones. The pinecones may need time to chill in the fridge so that they’re firmer and easier to handle, so in the meantime make the bark. Then put it all together!

The bark is designed to look like a birch tree, but feel free to use just white choc or just milk/dark choc. You could make the bark like I did for my coconut black forest cake.
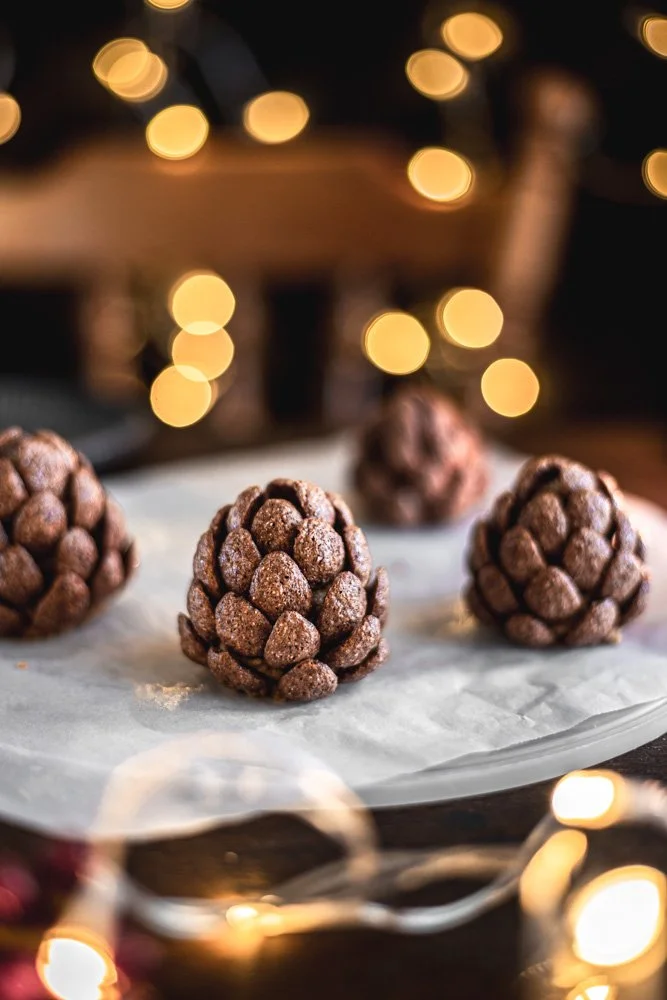
Use the images above and below as a reference for making the pinecones. If your cake cones are too soft and the cereal keeps falling out, refrigerate them for a little bit. I personally started sticking the cereal in from the bottom, however if you find it easier to start from the top, feel free! Remember that recipes are merely guides! I just write them the way that worked best for me.

Recipe
For the gingerbread spiced caramel cake
Makes 2 20cm round cakes
INGREDIENTS:
420g plain flour
2tsp baking powder
1/2tsp baking soda
1tsp salt
1 1/2tbsp ground cinnamon
3tsp ground ginger
2tsp mixed spice
290g unsalted butter, room temperature
300g brown sugar
4 eggs
2tsp vanilla extract
4tbsp golden syrup
375g sour cream
METHOD:
1. Preheat oven to 180°C and line and grease 2 20cm round cake pans.
2. In a medium bowl, sift together the flour, baking powder and soda, salt, and spices. Set aside.
3. In a large bowl or stand-mixer, beat the butter and sugar until light and fluffy. Beat the eggs in one at a time. Beat in the vanilla and golden syrup until everything is fully incorporated.
4. Add 1/3 of the dry ingredients and beat on the lowest speed. Add in 1/2 of the sour cream and beat. Repeat with half the remaining dry ingredients, then the remaining sour cream, then finally the rest of the dry.
5. Pour equally into the prepared cake pans and bake for 35-40 minutes or until a skewer comes out clean (or with a few moist crumbs - just no batter!) and the cake springs back when lightly pressed.
6. Cool in the pans for 20 minutes, then remove the cool on a cooling rack. If using a springform pan, just remove the outer ring and cool on a cooling rack.
7. Once completely cool, trim the tops of the cake to save for the pinecones and slice each cake in half horizontally to create 4 layers.
For the eggnog Swiss meringue buttercream
INGREDIENTS:
8 egg whites
450g castor sugar
650g unsalted butter, room temperature
2tsp vanilla
100g eggnog
1tsp grated/ ground nutmeg or to taste
METHOD:
1. Place the egg whites and sugar in the bowl of a stand mixer or a large heatproof bowl and hand whisk to roughly combine. Place the bowl over a pot of boiling water or a double boiler, ensuring the water does not touch the bottom of the bowl.
2. Gently hand whisk the egg whites and sugar over the heat until it feels hot and no longer gritty or grainy when you rub it between your fingers OR until it reaches 72°C (this will pasteurise the egg whites).
3. Remove from the heat and place the bowl back onto your stand mixer or onto your benchtop. Start beating on a low to medium-low speed with the whisk attachment or with your hand-mixer. When making meringue, the lower speed ensures the bubbles are smaller and more compact. Keep beating until you have reached soft peaks, then increase speed to medium to medium-high until stiff peaks form. This step may take a while. Feel free to give your mixer a rest from time to time.
4. Swap to the paddle attachment. With the mixer running on a medium-low speed, spoon in the butter, roughly a tablespoon at a time. Ensure the butter is fully combined before adding the next tablespoon. After adding all the butter, increase speed to medium-high or high and beat until it is thick and smooth. If it looks broken or loose, just keep beating it! It will come together eventually. It's like an emulsification. If it's still not coming together, place it in the fridge for 5-10 minutes, or until the sides have hardened a bit, then take it out and beat it again.
5. Add in the eggnog a little at a time, beating well. Add in the nutmeg and beat to ensure it is evenly incorporated. Optionally, once fully incorporated, reduce mixer speed to low to beat the air bubbles out of the buttercream OR fold and press with a spatula.
To make the edible pinecones
INGREDIENTS:
Cake trimmings
Eggnog buttercream, as needed
Chocolate shell-shaped cereal (in Australia, we have Milo cereal)
METHOD:
1. Process and mash together the cake trimmings (or just break apart with your hands and use a spoon or spatula to mush it all up). It should be able to hold its shape when pressed together. If not, add some buttercream if needed, just a little at a time. The drier the crumbs, the more buttercream you’ll need.
2. Take a little of the mixture (depending on how large you’d like your pinecone to be) and mould the mixture into a cone shape - larger at the bottom, smaller on the top.
3. Starting from the bottom, stick the cereal into the moulded cake mixture to create the bottom layer of pinecone scales (refer to the images of the pinecones).
4. For the next layer, stick the cereal between the gaps of the first layer (refer to the images, but it doesn’t have to be perfect!). Repeat until you reach the top of the cone.
5. Repeat steps 2-4 until you have the desired number of pinecones OR until you run out of cake crumb mixture. Place in the fridge to harden.
To make the ‘bark’
INGREDIENTS:
Approx. 200g white chocolate melts (unless you know how to temper white chocolate!)
Approx. 50g dark OR milk chocolate/ chocolate melts (doesn’t matter as much if you don’t know how to temper it!)
METHOD:
1. Line a large baking tray (or another one if you want more bark pieces to choose from) with baking paper.
2. Gently melt the milk/ dark chocolate in the microwave. Using a clean paintbrush, paint the brown birch tree markings (refer to images). If the chocolate sets on the brush, just wipe it off (it will come off pretty easily, like a shell). Leave to set.
3. Gently melt the white chocolate melts in the microwave. Make sure it’s not too warm. Pour this over your birch tree markings and spread it out evenly. Make sure it’s not spread on too thick. Leave to set.
4. Time to crack the bark! If you want yours more even like mine, use a ruler to roughly measure their width and bring a knife down to crack them at those points. If not, just use your hands to crack them into long shards.
To assemble
INGREDIENTS:
1 batch cake
1 batch buttercream
1 batch pinecones
1 batch bark
Rosemary (optional)
Icing sugar (optional)
METHOD:
1. Place a bottom layer of cake (the bottom half of one of the cakes) onto a plate, cake stand, or cake board.
2. Dollop some buttercream on top and spread it out evenly.
3. Place a top layer of cake (the top half of one of the cakes) on top. Repeat step 2.
4. Repeat step 3.
5. Place the final layer of cake on top, bottom side facing up. Cover the entire cake with a thin layer of buttercream and place in the fridge to chill until the buttercream is firm to the touch (crumb coat).
6. Remove from the fridge and spread another thicker layer of buttercream around the whole cake.
7. Decorate the cake using the bark (place each shard around the outside of the cake, slightly overlapping them), pinecones, and rosemary. Dust a little icing sugar on the pinecones to resemble snow.
That’s it!
Store covered in the fridge. Enjoy fresh at room temperature.
